Git Basics
- Repository
- Central location where a version of a project is stored and managed
- Remote repository
- versions of a project hosted on a network somewhere such as the Internet. There can be several remotes for a particular project with read-only as well as read-write permissions given to a user. Projects are managed on these remotes, also pulled from and pushed to them during collaboration for their further development.
- Local repository
- versions of a project on a user's local system, personal computer
- Upstream
- The repository where the original project exists. It is initiated with the
masterbranch. - Downstream
- The repository derived from the original, that is, the upstream repository. It is initiated with the
masterbranch as well, and has all the other supplementary branches present in the upstream repository.
Workflow
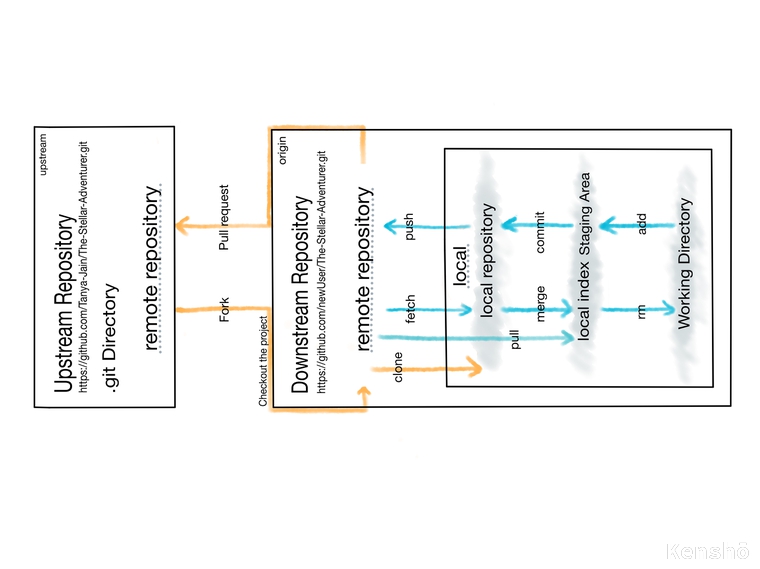
The image below describes the workflow of GitHub. For further understanding, it is recommended to follow the guide step-by-step. You can practice on this blog's repository with commands as illustrated below.

Fork the main repository
- Fork
- is used to copy the repository the owner organization's profile to our personal or remote profile.
Go to the repository of the own organization and press the Fork button.
- HTTP form
- https://github.com/Organisation/Repository.git
Clone the main repository
- Clone
- It generates a copy of the existing repository on the local system with its parent in the remote. It copies the .git directory, the most important of all.
git clone [upstreamRepoURL] will clone, that is copy the GitHub repository from the upstream remote branch to the local system
!Caution * The main repository must be forked even when cloned, to allow updating a version of the project as described below * You should ensure that you have entered the apt URL in the field [upstreamRepoURL]. The URL must be of the remote repository containing the main version of the project, the one it has originated from.
$ git clone https://github.com/Tanya-Jain/The-Stellar-Adventurer.git
This would create a directory in the local system for the repository named “The Stellar Adventurer” and initialize a .git directory inside it. All the data from the upstream would have been pulled inside it with a working copy of the latest version checked out.
If you want to clone the repository into a directory named something other than “The Stellar Adventurer”, you can specify that as the next command-line option, git clone [upstreamRepoURL] [directoryName]
$ git clone https://github.com/Tanya-Jain/The-Stellar-Adventurer.git blogIFollow
That command does the same thing as the previous one, but the target directory is called blogIFollow.
The directory of the GitHub project
In your terminal window, enter into the directory of the repository you have forked. (Using cd)
tanya@tanya-jain ~$ cd blogIFollow
Git Configuration for a recently forked repository
Working with remotes
Showing the remotes
Use git remote -v to list the remote repositories with permission for fetching and pushing of changes along with the HTTP URL. -v refers to the option --verbose. Not using this option would only list the name of the remotes.
tanya@tanya-jain ~/blogIFollow [master]$ git remote -v
origin    https://github.com/Tanya-Jain/The-Stellar-Adventurer.git (fetch)
origin    https://github.com/Tanya-Jain/The-Stellar-Adventurer.git (push)
Inspecting the remotes
To get an extensive list on details regarding a specific remote, use git remote show [remoteRepositoryName]. This command displays the following details:
* remote short-name
* URL
* Fetch URL
* Push URL
* HEAD Branch
* Remote branches
* Local branches configured for git pull
* Local references configured for git push
Configuring the remotes
We are doing this to ensure our .git directory is correctly configured for further editing and managing of the files.
Now, remove both the remote repositories using the command git remote remove [remoteRepositoryName]
There, wouldn't be any output if the branches are tried to be listed with git remote -v.
Removing remotes
tanya@tanya-jain ~/blogIFollow [master]$ git remote remove origin
Now, the forked repository needs to be added in the branch to both fetch as well as push the changes.
Adding remotes
git remote add [remoteRepositoryName] [url] or git remote add [remoteRepositoryName] [SSH]
It is advisable to use SSH as it is beneficial to get the work done faster by not needing to enter the password multiple times. Though the first time it would be compulsory to enter the password.
tanya@tanya-jain ~/blogIFollow [master]$ git remote add origin https://github.com/newUser/The-Stellar-Adventurer.git
tanya@tanya-jain ~/blogIFollow [master]$ git remote add upstream https://github.com/Tanya-Jain/The-Stellar-Adventurer.git
The remote repository has been given the name origin and will be used to push the changes from the local system to the newUser's remote repository. The original remote repository has been named to upstream and will be used to fetch the changes from the main repository, that is, Tanya-Jain's remote repository.
The following configuration is achieved:
tanya@tanya-jain ~/blogIFollow [master]$ git remote -v
origin    https://github.com/newUser/The-Stellar-Adventurer.git (fetch)
origin    https://github.com/newUser/The-Stellar-Adventurer.git (push)
upstream    https://github.com/Tanya-Jain/The-Stellar-Adventurer.git (fetch)
upstream    https://github.com/Tanya-Jain/The-Stellar-Adventurer.git (push)
Working with branches
Branches can be thought of like that of a tree. Different users work on different branches which emerge originally from the main repository, the bark of the tree.
It is advised to implement your code on different branches. Preferably, a unique branch should solve a unique issue. This branch shall be removed once the code has been merged into the main repository.
Working on the main branch can lead to several conflicts as the usage of code increases. It increases the risk in the manipulation of the code in the main repository, especially if you are among the managers of the repository as well.
Displaying branches
The branch used in the .git directory by the newUser's remote can be listed out via git branch
tanya@tanya-jain ~/blogIFollow [master]$ git branch
* master
Create a new branch to work on
To create a new branch git branch [newBranchName]
tanya@tanya-jain ~/blogIFollow [master]$ git branch develop-data
tanya@tanya-jain ~/blogIFollow [master]$ git branch
develop-data
* master
tanya@tanya-jain ~/blogIFollow [master]$ git status
On branch master
nothing to commit, working directory clean
To push the made branch as commit
tanya@tanya-jain ~/blogIFollow [master]$ git push origin develop-data
Username for 'https://github.com': Tanya-Jain
Password for 'https://Tanya-Jain@github.com':
Total 0 (delta 0), reused 0 (delta 0)
To https://github.com/Tanya-Jain/The-Stellar-Adventurer.git
* [new branch] develop-data -> develop-data
git push -u [remoteRepositoryName] [newBranchName] will push the newly made branch from local to the upstream remote. Hence, the main repository will have this new branch as well.
3 Stages of updating versions of a project
You have successfully set up your local repository with a branch develop-data. Go on and edit your files which shall go through 3 main stages:
1. The Working tree/directory
Modified files
Files are initially saved here after editing, known as modified files. These files have been originally been obtained after a pull from the main remote and saved into the local repository for further editing.
The Working directory contains a version being modified of a particular branch activated. One can switch among branches via git checkout [branchName].
tanya@tanya-jain ~/blogIFollow [master]$ git checkout develop-data
tanya@tanya-jain ~/blogIFollow [develop-data]$
2. The Staging area or the Local Index
Staged files
The modified files in the local need to be staged in this area for further addition the remote. Use git add /path/to/file to add files and git rm /path/to/file to remove files from the staging area.
The files store data of what changes will be present in the next commit. They are added to the staging area in form of snapshots. The different version in the project are indeed saved as different versions of snapshots per file in GitHub version control.
tanya@tanya-jain ~/blogIFollow [develop-data]$ git status
On branch develop
Changes not staged for commit:
(use "git add <file>..." to update what will be committed)
(use "git checkout -- <file>..." to discard changes in working directory)

modified: assets/css/main.css

Untracked files:
(use "git add <file>..." to include in what will be committed)

h -u

no changes added to commit (use "git add" and/or "git commit -a")

tanya@tanya-jain ~/blogIFollow [develop-data]$ git add assets/css/main.css index.html
git status helps to check the status of the staging area.
- Untracked Files
- Files that are recently created but never committed, or files that are not being tracked at all for addition to thee .git directory.
3. The Git directory
Commit files
This directory contains the metadata and object database for a project. It is the one copied to local system on cloning a remote. On commit, the snapshot of the version staged for commit is permanently stored in the .git directory.
tanya@tanya-jain ~/blogIFollow [develop-data]$ git commit
This would open the default text-editor. The first line entered will be the title of the commit message. Leave a line and type the description for the commit explaining the changes implemented in this new version of the project. This is the suggested format for a commit message.
Always explain your code in as much required detail as possible. It should not leave anyone in any assumption.
For a fast-track process, one may use git commit -m "Title of Commit Message" to quickly commit the staged snapshot and avoid typing the description of the commit.
Difference in snapshots
To check the difference in snapshots from two different versions of the project, the one on upstream remote and the other on the local, use git diff
tanya@tanya-jain ~/blogIFollow [develop-data]$ git diff
Pull = Fetch + Merge
Fetching data
git fetch [remoteRepositoryToFetchFrom] is used to fetch data from the remote repository to the local repository.
Merging data
git merge is used to merge data of the local repository with the working directory.
Pull
git pull [remoteRepositoryToPullFrom] [branchToPullFrom] performs two functions at once, that is, it first performs a fetch to the local repository and then immediately tries to merge the changes in the local repository to the working directory, as much as possible.
tanya@tanya-jain:~/blogIFollow [develop-data]$ git pull upstream master
At times, you would encounter an error stating fail to pull. This is because of conflicts in the two versions of your file which must be resolved manually before merge can take place.
It would be of the form: statements in the working directory version ------ statements in the fetched version ----
The lines generated to enclose the abovementioned statements should be removed completely before the successful merge of files. Also, the two statements should be manually merged so as not to allow any compromise in your code.
Push
To finally push the snapshot of the new version of the project from the local to the remote, use git push [upstreamRepository] [branchWorkingOn]
tanya@tanya-jain:~/blogIFollow [develop-data]$ git push origin develop-data
Pull Request
Go the URL of the remote on the Internet and review your commits. Once satisfied, make a pull request by clicking a green colored button on top-right.
Powered by Markdown


